 |
TechnoPHILEPlugged-in stuff. Content related to technology, hacking, electronics, and software. |
 |
TechnoPHOBEUnplugged stuff. Non-tech, primitive/ancient tools, techniques, or archaic tech. |
|---|
Heather Costume: Dragons: Race to the Edge
by Steve Struebing on Feb.26, 2019, under Cosplay

The time has finally come for the long-awaited release of How To Train Your Dragon: The Hidden World! Our house has some huge fans of the series due to its gorgeous visuals, endearing characters, and a musical score that soars as high as any Night Fury. Netflix also released a series of original programs called Dragons: Race to the Edge (2015 – 2018) introducing a host of new characters and villains. In the new adventures, we continue to follow Hiccup and Toothless in their quest to keep dragons from the clutches of human trappers. One of our little fans has pulled yours truly into more than one episode’s viewing (understatement). When our oldest gal requested to be Heather this for Halloween, it was time to get some Razorwhip scale armor together to outfit the little lady.
What You Need To Gather
Materials For Building
- Faux Fur (for boot covers)
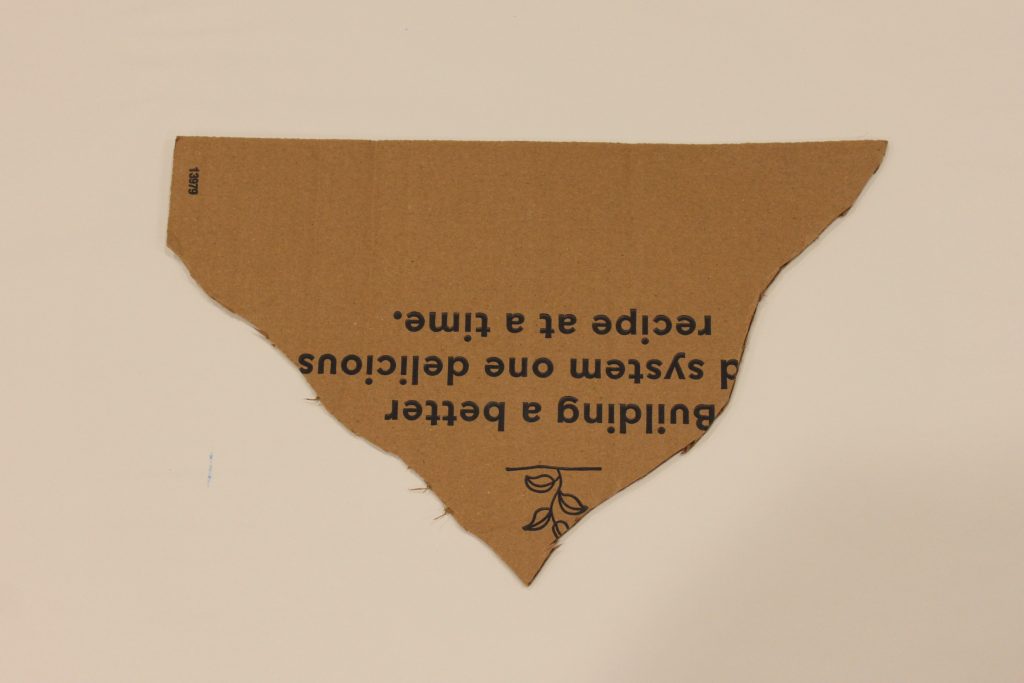
- Cardboard
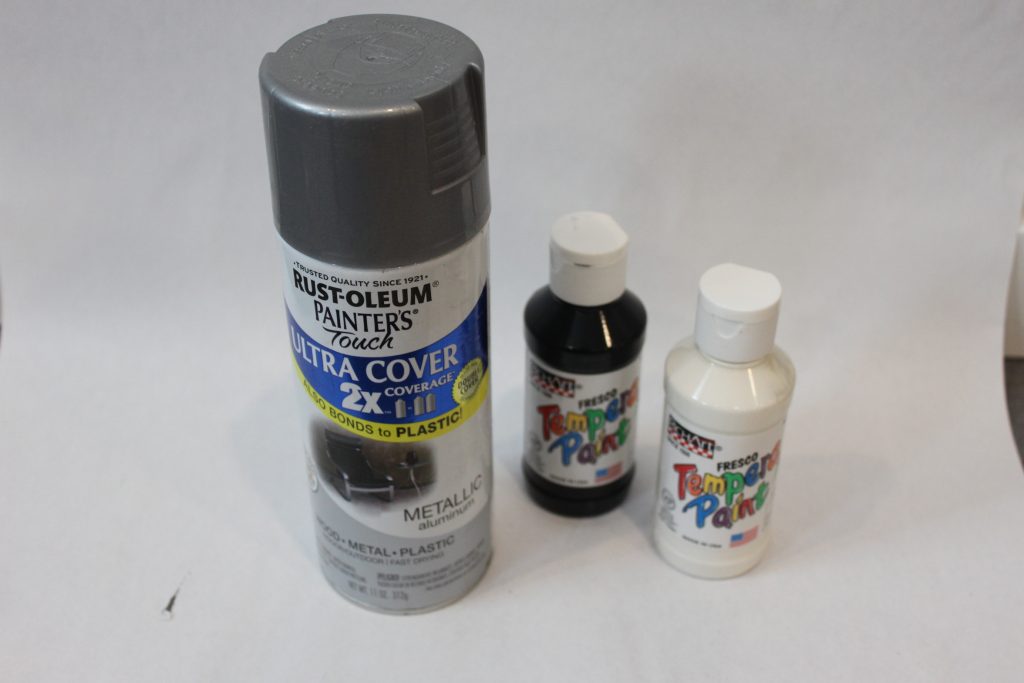
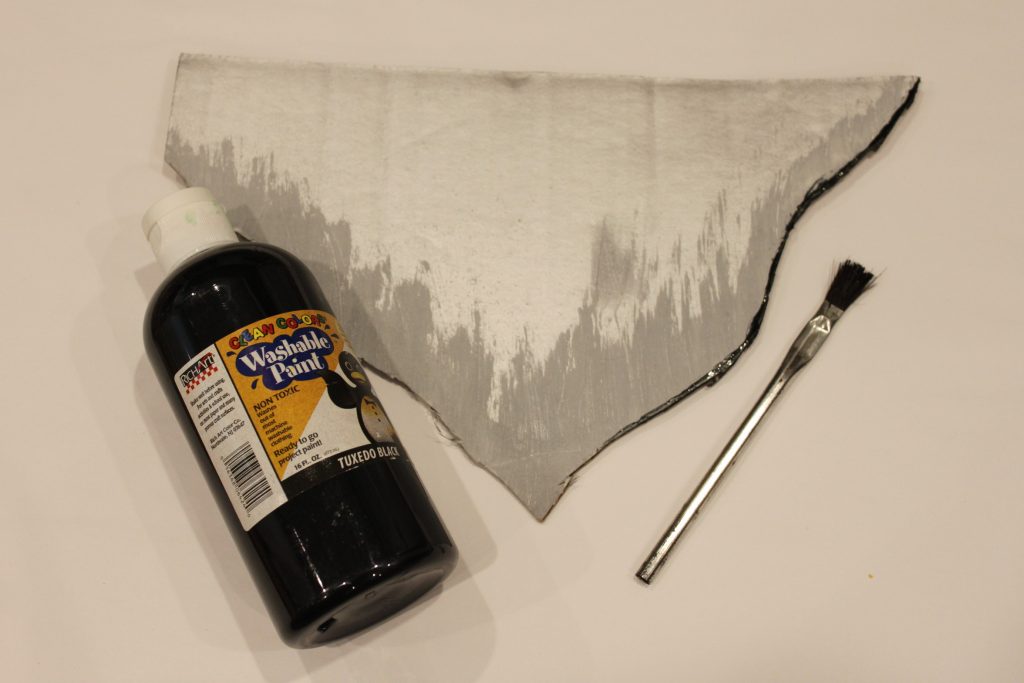
- Metallic Aluminum Spray Paint
- Black and White Tempera Paint
- Rope
- Twine / String
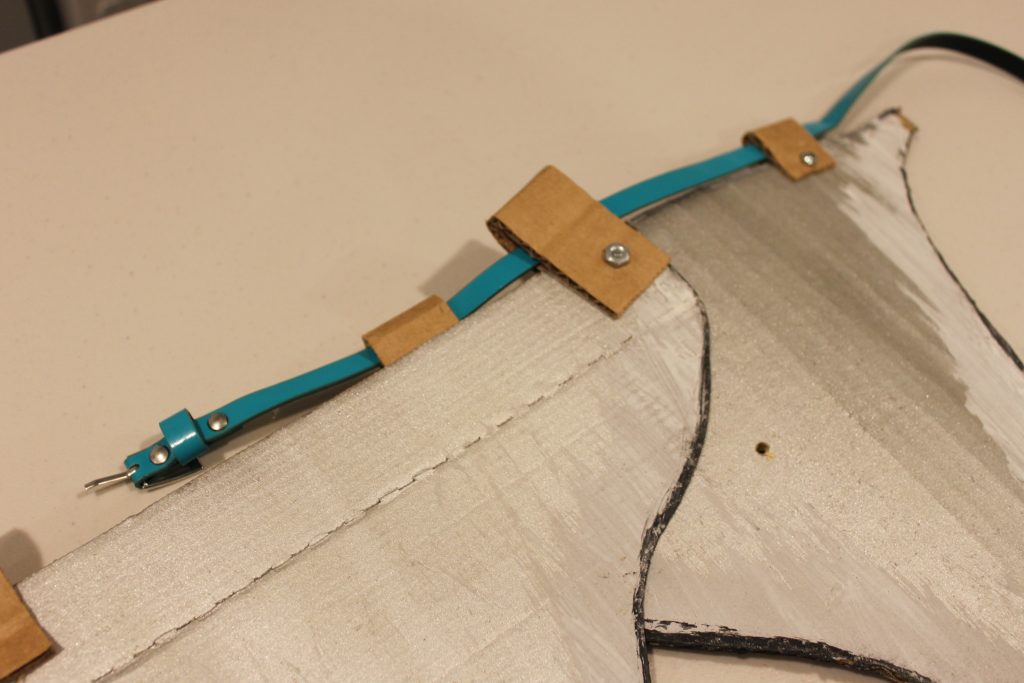
- Small Belt (for attaching plated skirt)
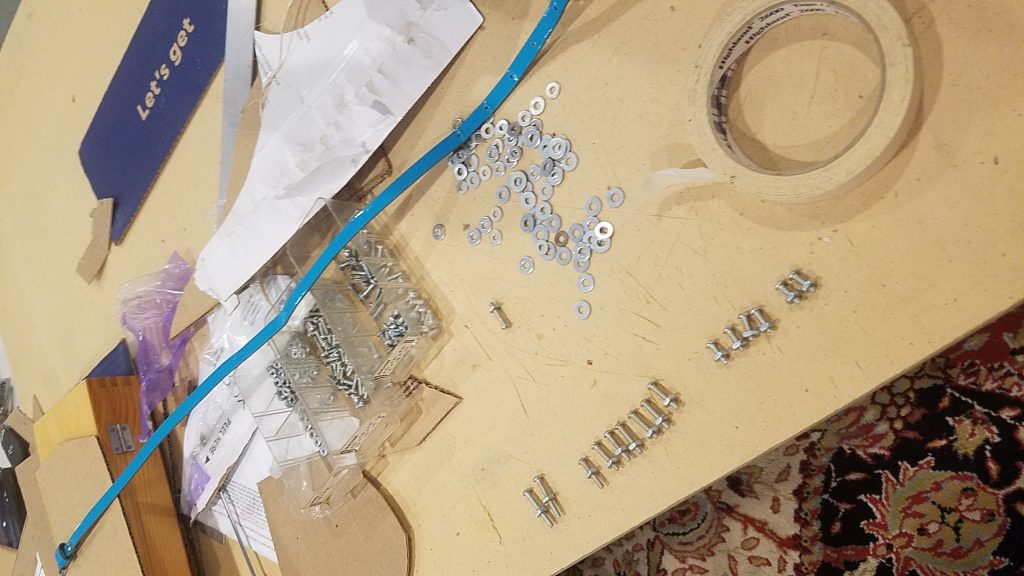
- Nuts, bolts/machine screws (8-32 work well), washers
Costume Elements Worn As Is
- Sequin skirt (representing Chain Mail)
- Thick leather belt
- Black wig (long enough to take signature thick braid
- Vest
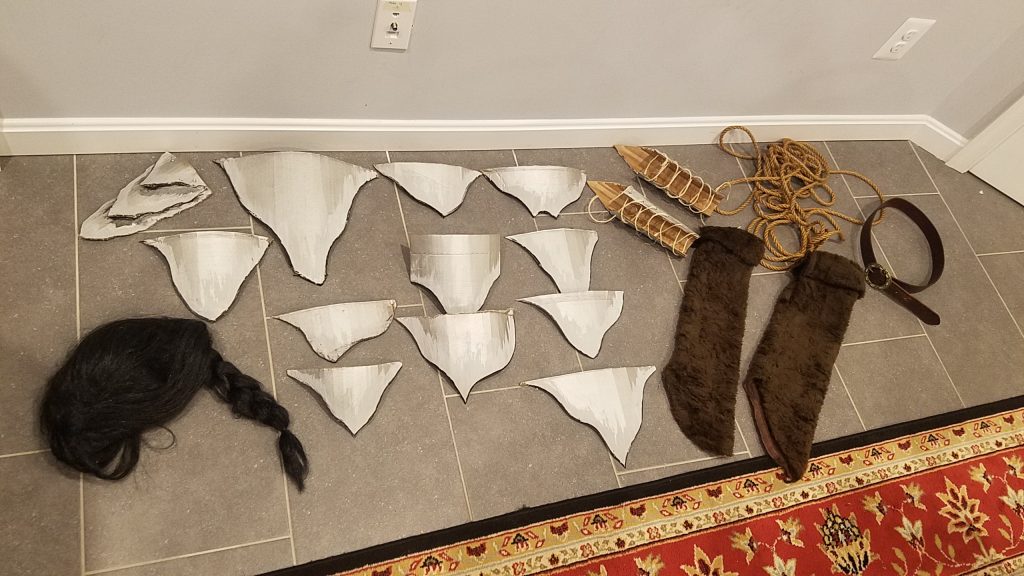
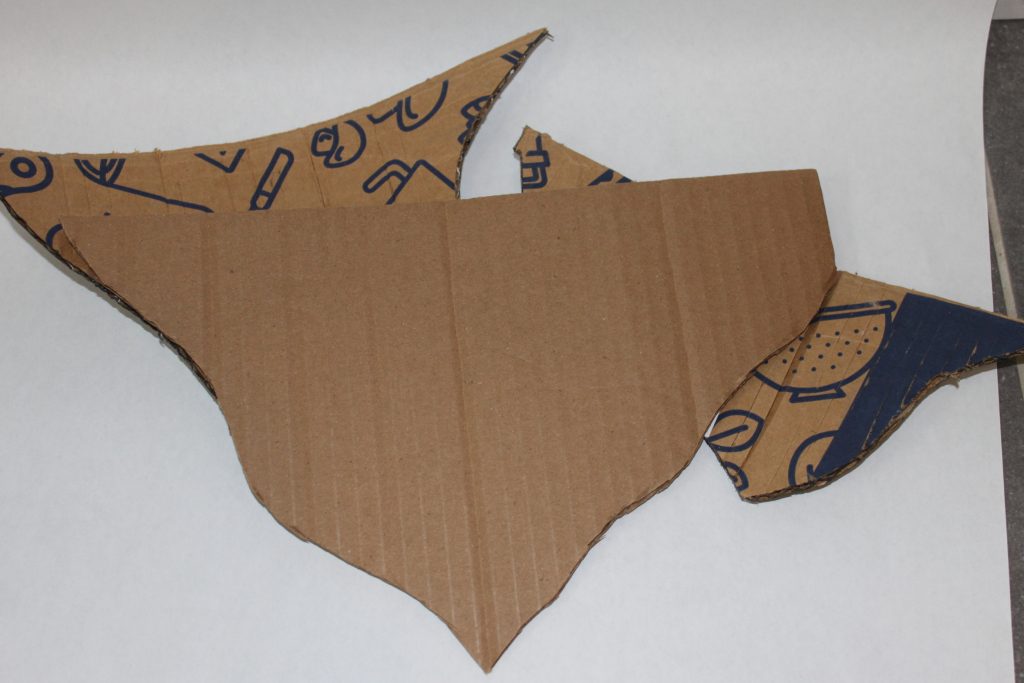
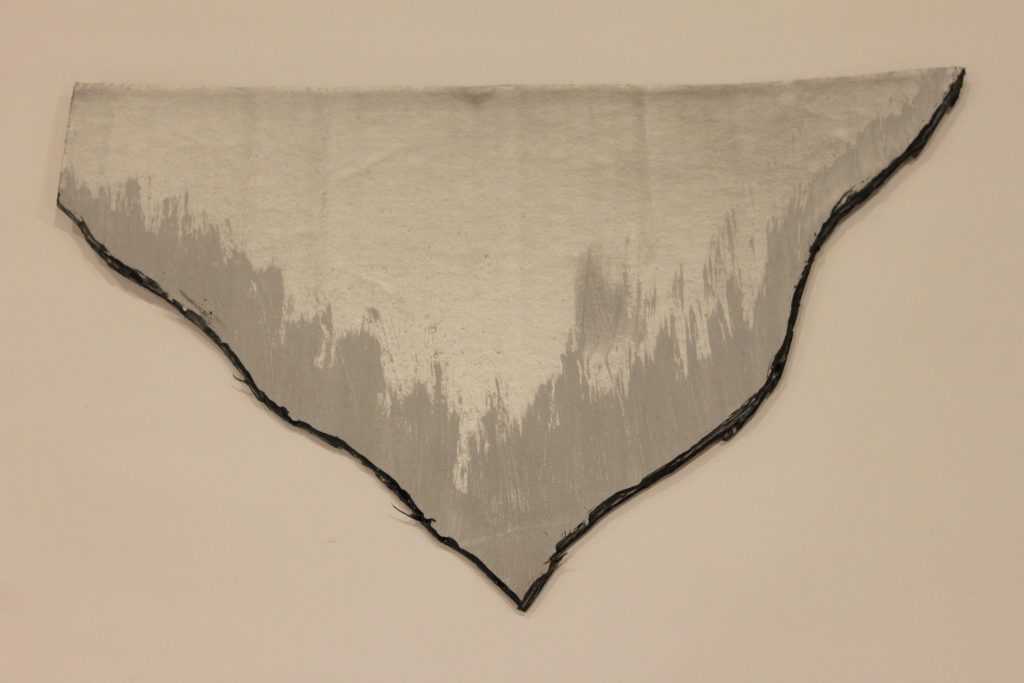
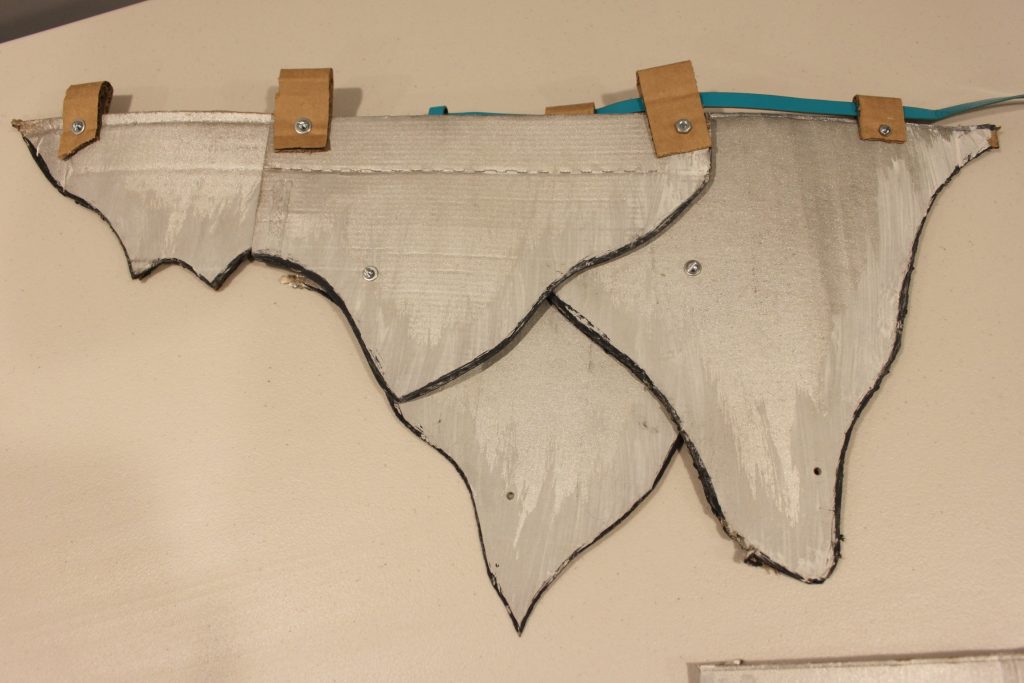
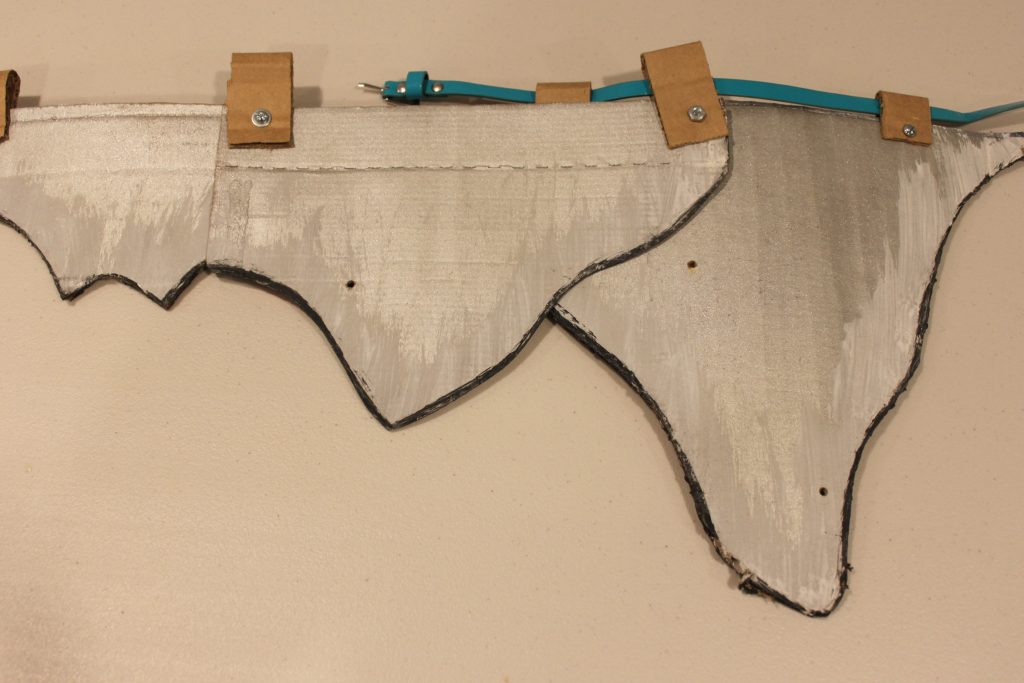
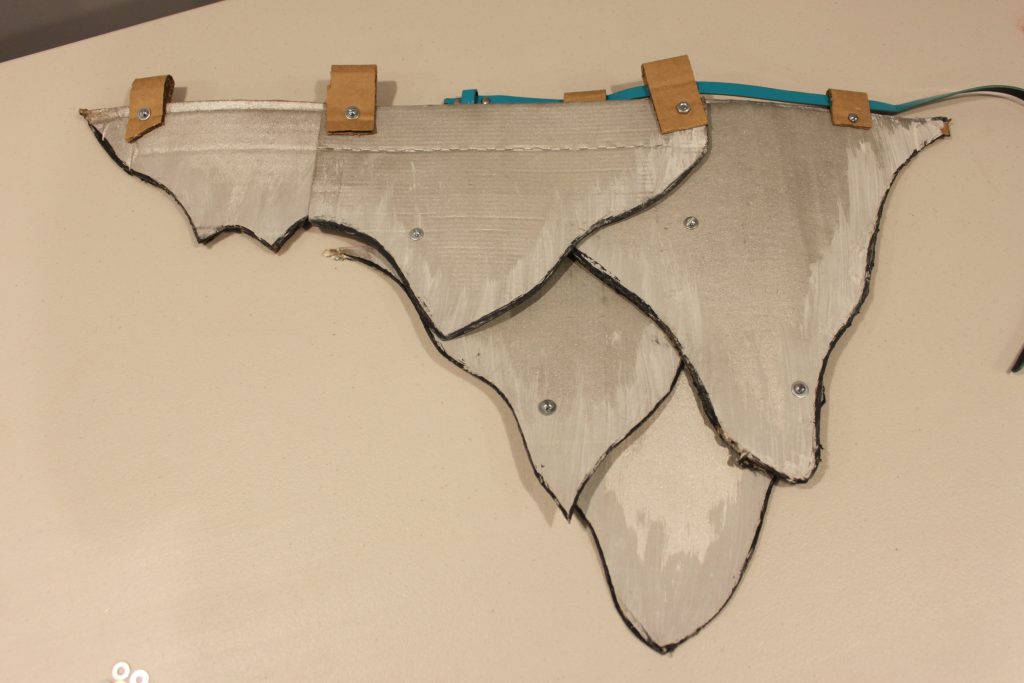
Armored Skirt: It’s Really A Matter Of Scale
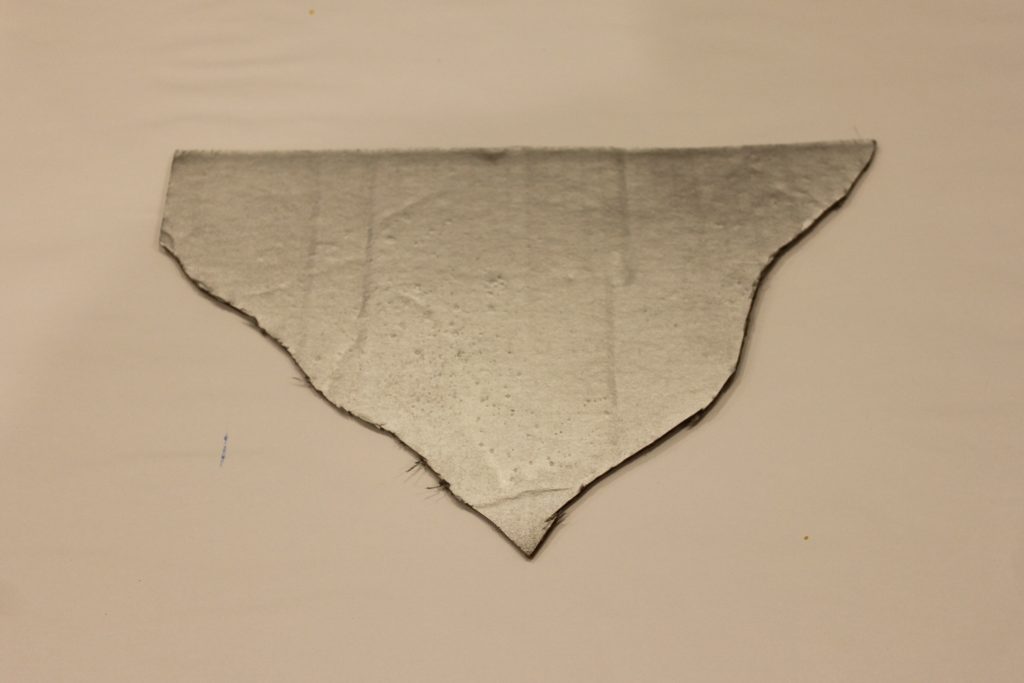
The Razorwhip dragon that Heather rides (Windshear) has a reflective silver scales with frosted highlights and black shadows. Scales of this armor form Heather’s plated skirt in an open fashion to the right, and heavy plating to the left side.


C’est l’armour
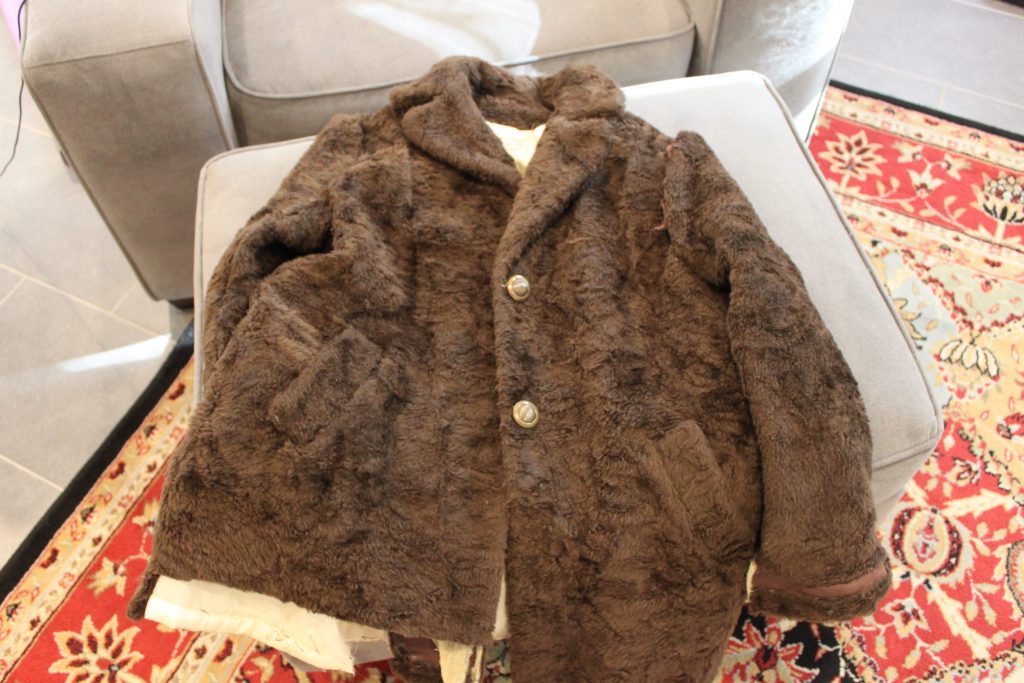
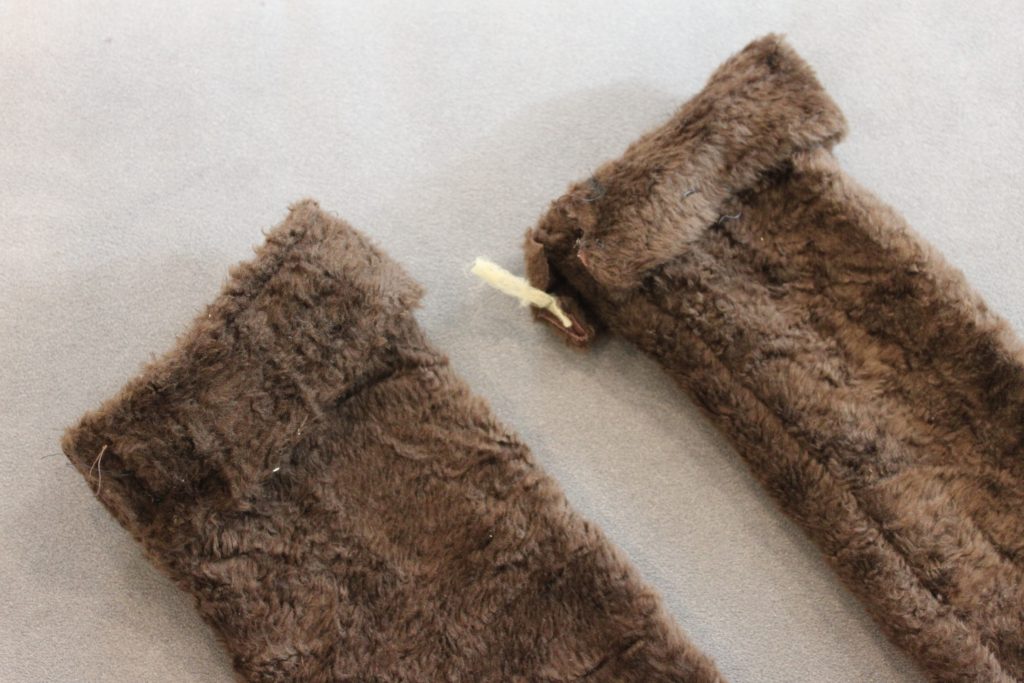
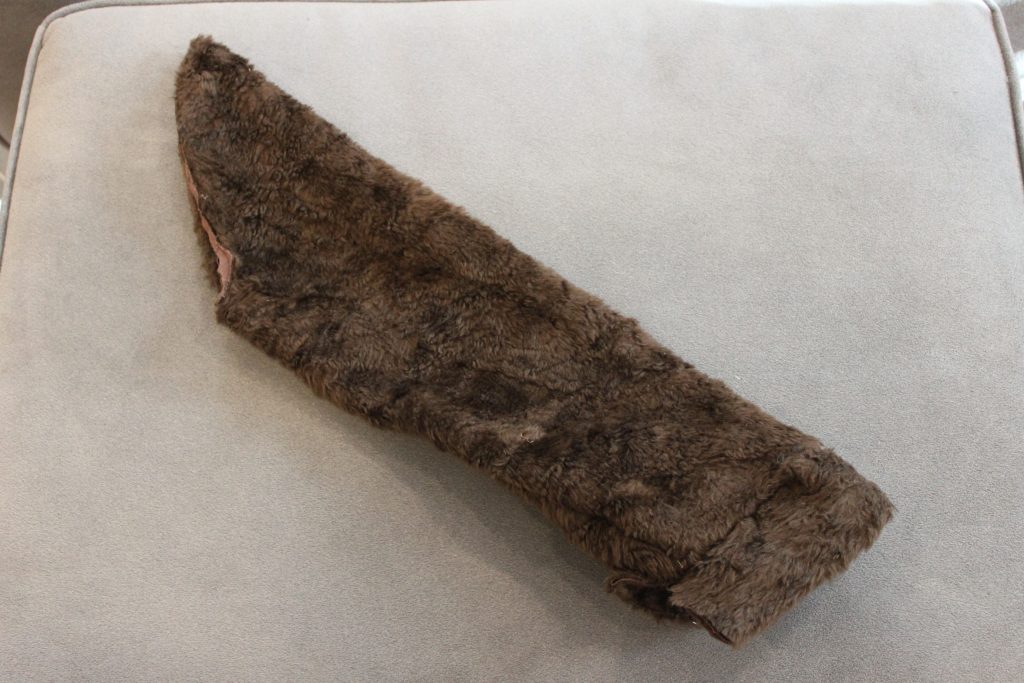
Boots: You’ve Got It Covered
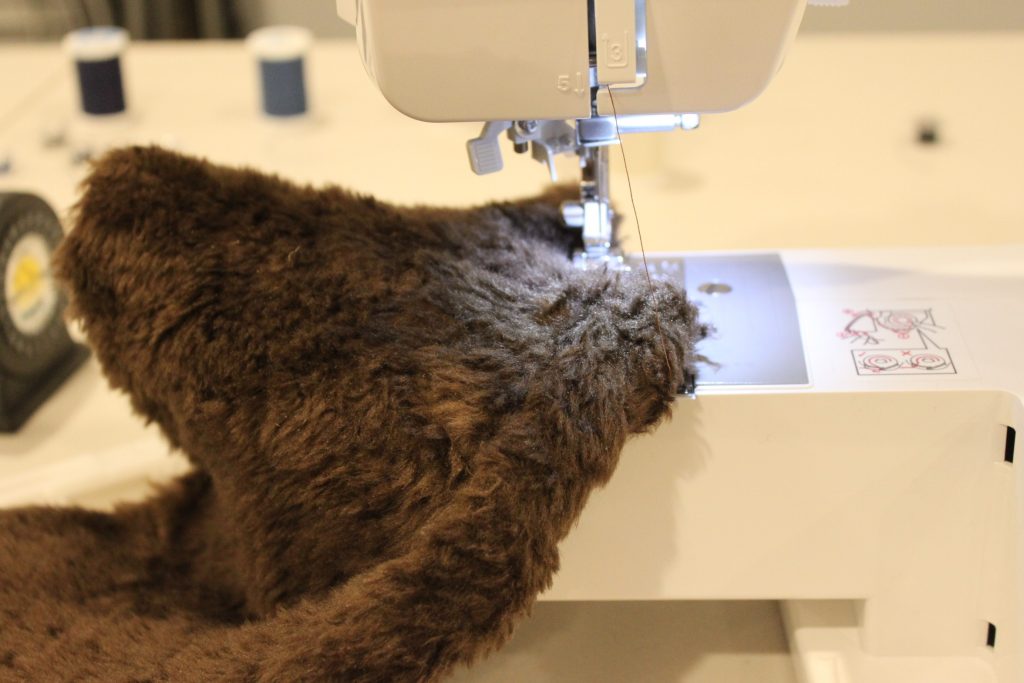
I bought a used faux-fur coat, figuring I would be able to use the faux fur fer somethin’ else too. Cutting along the coat/sleeve seamline gets you 80% to a bootcover, and can serve as the pattern if you needed to do it from scratch. Using a sleeve “stock” did create bunching, so opening the long seam to adjust, or cutting a horizontal slit portion, and removing fabric to clear the bunched material and resewing into an angle for the foot may do the trip. This is up to your level of effort (I opened the seam and adjusted).
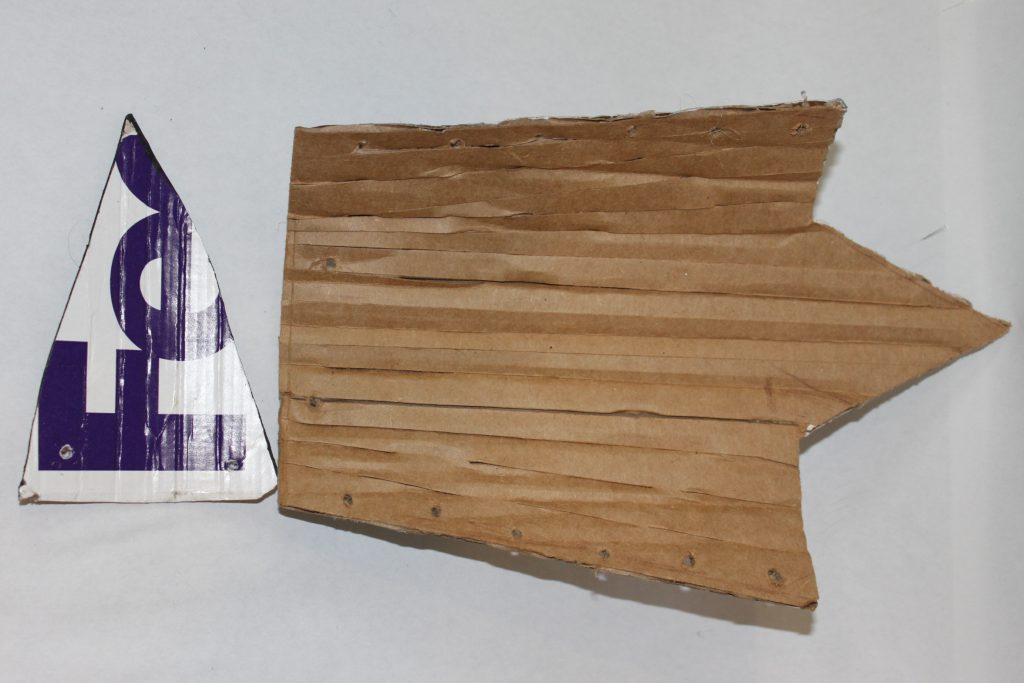
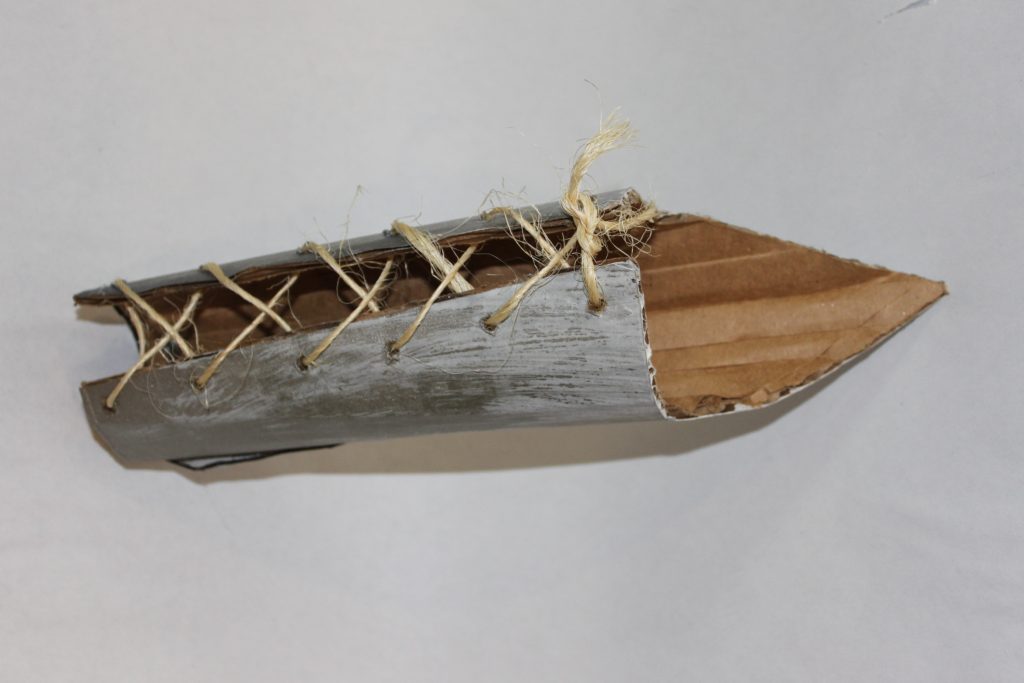
Throwing Down the Gauntlets
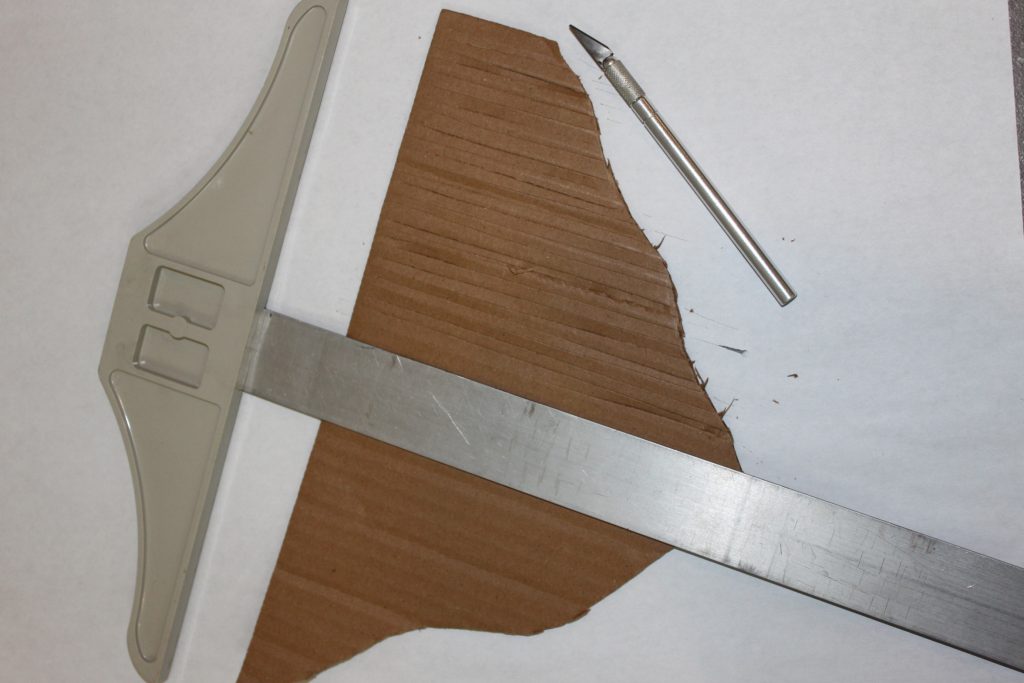
To get the gauntlets to flare from wrist to forearm, you need to cut and score in the pattern shown. They should fold to a close, and have a long point that comes from the elbow, while allowing your little Heather to bend her arm. You will also need a small decorative plate that will curve over the main gauntlet and give it depth.

The Shoulder Piece
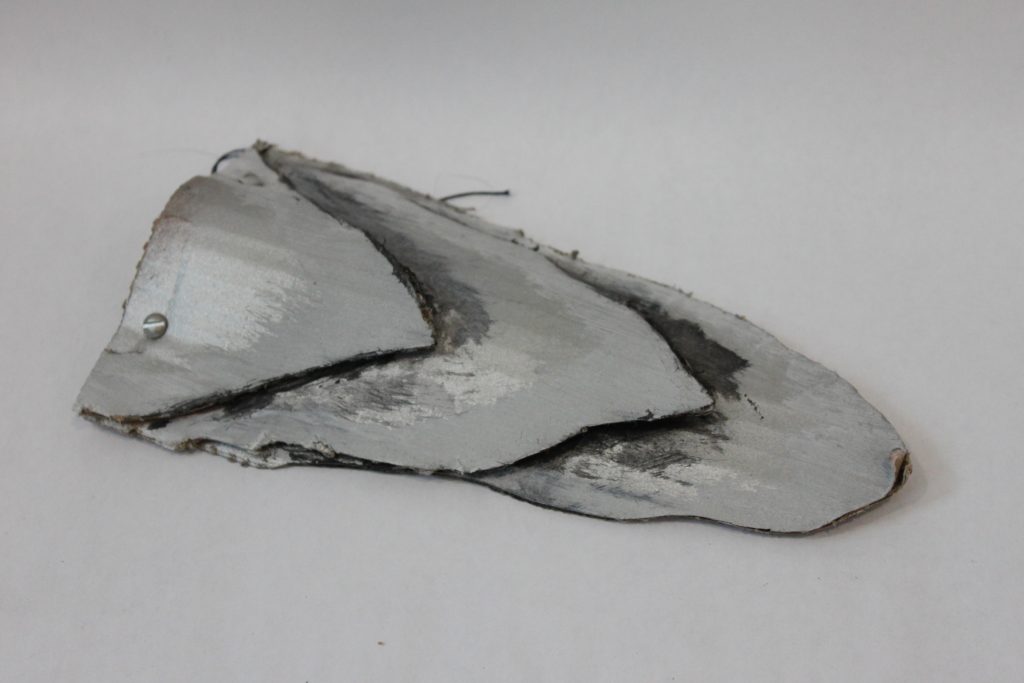
Heather has a rather distinctive shoulder adornment over her non-hair shoulder.
Cut three long tapering plates that will stack, each smaller with a mostly-similar shape. Apply the same scoring and painting. Hold a small arch in the bottom most plate and apply the next plate over it with a pair of screws, nuts, and washers. The tension of the higher plate will actually hold the curve in place. See how the top plate pinches in and holds the curve.
This will attach by having a small twine loop that ties onto the machine screws and goes around the next.
Heather Up!
Prepare you little dragon rider in her sequined skirt and long sleeved shirt ideally with a little collar to prevent the shoulder-plate string from scratching. Attach and adjust the plated belt. I actually assembled some more plates on the little warrior at this point. Boot covers on and then the shoes go underneath, (of course). The rope is looped around and tucked in the boots. Attach the shoulder plate with a sting looped around her neck. Add the finishing touches.. . vest, and the ever-so-cool braided hair.
There you have it! It was just a couple hours in an afternoon to assemble the costume, and it’s always fun to do some assembly on the most creative holiday of the year, in one tinkerer’s opinion. So, grab your trusty Razorwhip dragon, and have your little one take to the skies as Heather!

3-D Printing: Thought to Thing at Lightspeed
by Steve Struebing on Oct.07, 2012, under technoPHILE

Intro
Imagine a world where anytime you needed an item, you would just download a drawing of the thing from the web, or draw it yourself, feed it into a machine, and you’d have it. Well, we’re just about there (within reason of complexity and materials).
For several years a revolution in prototyping/manufacturing has been going on through various techniques of 3-D Printing. That name is often confusing to people who quickly envision printing 3-D images (needing 3-D glasses) with a 2-D printer. While that may be cool, this is way cooler. Way, way, cooler. This is 3-D building. I will continue to call it printing, but it’s actually building up the object so you finish with a tangible REAL item.
The machines needed in years prior required big dollars and were relegated to corporations and individuals like Tony Stark (that’s Iron Man, for those whose fingers may be off the pulse of contemporary films). Hobbyists had also been hacking away to bring this technology into their garages.
A while back, some of my friends and I attended a build session at HacDC for a machine called a RepRap. <tangent>This is a 3-D Printer whose intent is to eventually print itself. Collect the pieces of your brain off the floor and walls and come back to me </tangent>. It seemed that the 3-D hobby space was coming a long way…and fast.
Disclaimer: I am going to try to keep this whole deal simple for beginners. I am not going to talk about support material and overhangs, talk about stepper motors, etc.
Simple Concept: This is not like starting with a block of something like wood and carving, filing, or drilling it out to shape it. That is a subtractive process. This is an ADDITIVE process: building up. The 3-D printer I will be discussing heats up a string of ABS plastic (stuff LEGOs are made of) and pushes it through a little nozzle (fancy name: extruder). 3 motors put the nozzle in the right place (one motor per axis: X, Y, and that glorious new Z). Now, how the hell does it do that? I am going to take a liberty that some people will flag me on, but this is for beginners. You know when you hold a relaxed slinky and it is a cylinder? If it had a base under it then you would have a leaky cup, right? BUT, when you uncoil it, it’s a long string of plastic. That’s kind of how it works. (Note: the 3-D printed cups don’t leak though)
When MakerBot industries released their 3rd generation 3-D printer the Replicator, it was go time for this hacker. By the way, this was funded by some of the proceeds of the HALO project (thanks again Humana and Instructables.com!!!)
Making a 3D Model:
I am going to take you through the process of making a scale staircase for my model cities I have put in previous posts. Making them through other means was a major pain!

Actual completed stair model

3-D Printed Stairs - All Views
Just like virtually every other aspect of this stuff, 3D Modelling is a topic in and of itself. There are many tool alternatives out there. I use SketchUp (used it to model my basement, logos, and of course stuff to print). It consists of creating a series of lines, called “edges”. Once these edges create a closed shape, you’ve created a “face”. Point A->B is a line (edge). Point B->C is now an angle (or a line with a hinge) Point C->back to A. TRIANGLE…et voila! A close shape also known as a “Face.”

Edges being drawn for the stairs

Face has been created
Once you have a “face”, you can push or pull it in the tool to make an object of depth. Like if I took a circle and it left a trail in the air, if I lifted it straight up, it would make a cylinder. You can then export the 3D model into a file format called a .STL file (note: using an external plugin you will have to install). I see your eyes closing… Look, all those points we made to describe edges and faces are captured into a file as x,y,z positions.

Push/Pull of Face to create depth
3-D Model into Tool Commands:
The tool software for my machine (ReplicatorG) takes the 3-D STL model and starts generating the way the extruder should move to make that object (starting from the bottom up).

STL model in ReplicatorG software tool
It “slices” that model up into thousands of 2-D cross-sections. Like if I were to take a cross-section of an orange at the base, it would be a small circle. In the midpoint, a large circle, and as I approach the top, smaller and smaller circles. This is what is going to be printed. These concentric circles in our orange case are what the extruder is going to lay down in plastic through a “go from here to there” language called G-Code.
Example of this somewhat cryptic stuff:
M103 (disable RPM) M73 P0 (enable build progress) G21 (set units to mm) G90 (set positioning to absolute) G10 P1 X0 Y0 Z0 (Designate T0 Offset) G10 P2 X33 Y0 Z0 (Designate T1 Offset) M109 S110 T1 (set HBP temperature) M104 S220 T1 (set extruder temperature) (temp updated by printOMatic) G55 (Recall offset cooridinate system) G1 X-2.0 Y13.65 Z0.14 F3360.0G1 F1200.0 G1 E11.53 G1 F3360.0 M101 G1 X-2.0 Y27.82 Z0.14 F2214.0 E12.145 G1 X-1.6 Y28.22 Z0.14 F2214.0 E12.17G-Code to Object
The Replicator heats up to the prescribed temperature based on the material to be used (again, its ABS LEGO-stuff plastic). Following the G-Code “go from here to there” instructions, it lays down the plastic on the build platform creating the bottom of the object. Once the first layer is done, the machine drops the platform down just a teensy bit, and does the next layer…and again..and again.. and we’re building up an OBJECT IN 3-D!!!!!!
Object
The machine does not necessarily fill in the whole object. You can configure it to just lay in a honeycomb pattern so you still get rigidity and use less material.
Note honeycombing to right of stair edge
Once the build is complete, you can pop it off the build platform, and you’re holding a REAL, 3-D durable plastic object. There is a website called Thingiverse where tons and tons of items are free for download and where you can contribute your models back to the world.
Some of my other custom models I have made/modified
Summary:
The awesomeness of this fabrication technology cannot be overstated. For a prototyper/tinkerer like me, it’s like having access to splitting an atom. It’s a game changer. It’s the future in all of its promise and peril. As you let your mind run out to future states you can envision custom-fabricated limb-replacements on demand, or armies of printing robots reproducing and taking over the globe. We’ll see where we end up, but either way, this is some fascinating technology. Now, time to go install that coat hook by the door. Oh wait, I have to print it first…
Stairs all built up and ready for use


JUNKies: Beer Fridge Build
by Steve Struebing on Oct.16, 2011, under technoPHILE
After enjoying major success with his Beer Fridge in Popular Science, The Graham Norton Show, and on YouTube, I had the good fortune to meet Ryan Rusnak and found he was also living in NOVA (that’s Northern Virginia, to all you SOVA’s, and others). He was approached by the production company for JUNKies which was airing on The Science Channel. They wanted a beer fridge, but bigger and better. Ryan was kind enough to ask Jay@TheCapacity and I if we wanted to help prep/prototype a build he would be doing at Jimmy’s Junkyard for the show. We were happy to oblige!

Hovercrash
Premiere: Thursday, September 8 at 10PM e/p
At Jimmy’s Junk two inventors need help turning a fridge into a beer launcher, and Hale lands himself in hot water. Later a high school class’s hopes may go crashing into a watery grave when they ask Jimmy to come up with an engine for their hovercraft.
THE PREP

Cutting metal for the ramps that will load the cannon

3am the day of filming, Ryan checks the fridge, Jay considers the code.
THE SHOW
Here are shots from the airing on The Science Channel. How Ryan and Josh got everything integrated in Jimmy’s Junkyard, and used stuff from the yard to make it work is nothing short of a miracle! I can confirm it involved coding in the car, and one very tired Ryan driving up to New York.

Josh wheels the fridge in while Ryan looks on cautiously.

Jimmy “The Junk Genius” Ruocco

My favorite shot: From my whiteboard, to a build, back to a whiteboard for TV.

Behold the fridge in its glory!

Cannon, ioBridge, and the careful observer will see a Construx piece on the power circuit.

Three brave souls face the firing squad without blindfolds.

Jimmy preparing to fire. Josh is thinking: "Please don't crash, software", and Ryan hoping the PSI is not going to kill Jimmy.

First Launch: Shower time

2nd Launch: Great snag by Ryan Rusnak!
This build was a lot of fun, but reinforces several of lifes important rules:
1- Never send 4 software engineers to do a Mechanical Engineer’s job
2- Never send 4 software engineers to do an Electrical Engineer’s job
3- Whatever your estimates are for working out the motors/mechanical and getting into “just software”: Multiply them by at least 3.14159 (thank “Making things Move” for that observation)
4- When an air cannon with too much PSI goes off at 2am in your neighborhood and sounds like the Horn of Gondor, and nobody complains, you know you’ve got good neighbors (thanks Ken, and Jeff).
5- Building things together is a hell of a lot of fun.
6- Rule 5 is all that matters.
Thanks to Ryan for roping me and Jay@TheCapacity into this build. My dremmel was collecting dust, and my garage needed to be turned into a lab for a little while.
WUSA9: Super NOVA Writeup on HALO Project
by Steve Struebing on Jun.27, 2011, under technoPHILE
I was recently written up in WSA9’s weekly highlight for a local person who has an interesting hobby, has made a business impact, is a philanthropist, …..or who can provide any content for them to meet a deadline. My thanks to Ryan Rusnak for nominating me as a Super NOVA, and Ellen Scott for interviewing me and posting the article.
Post your best caption for this awkward cutscene shot below in comments 🙂
Link to Article
http://annandale.wusa9.com/news/news/super-nova-innovative-spirit-annandale-resident-builds-device-aid-blind/57964
.
Scale: Carbon Atom to Massive Star
by Steve Struebing on May.30, 2011, under technoPHOBE
Though my blog is primarily focused on DIY, I think every once in a while some general information is appropriate because it is central to why even bothering with learning or doing anything…at all.. let alone doing it yourself. While these aren’t the answers to the big questions of where we are from, or what’s it all for, the two links below can instill amazement and appreciation of this universe we are citizens of for a short time.
Nothing new here. We’ve been taught size and scale throughout our lives. Then, when quantities are sufficiently small or large, our perception loses a handle on something to keep it in relative perspective. You take photo of a statue with someone next to it and say “wow, that’s a big statue”. What is 1 x 10^100 vs 10 x 6.022 x 20^23? They are just big numbers. We can talk about them, but lose sight of how big they are. Well, take some time to watch the two following links in succession. Study them and really try to keep their relative sizes in the working store of your mind. Compared to the carbon atom, how big are we humans? Compared to Betelgeuse, what is the amount of atoms we contain?
I showed these two links to my department at work to open a meeting. Some commented on feeling insignificant afterwards, others amazed that they could look up that night and see many of the stars called out (Betelgeuse, Pollux, Aldebaran, Sirius). They all seemed to again reflect on where we fit in the scheme of things.
The universe is a big place. There is a lot out there to try to understand. Why not start here?
Let’s Start Small
http://learn.genetics.utah.edu/content/begin/cells/scale/
Wild Garlic Soup
by Steve Struebing on May.15, 2011, under technoPHOBE

As a kid growing up in Western Pennsylvania, we always seemed to have shoots of a particular weed growing up ahead of the grass in the spring. Obviously being an inquisitive (and foolish?) kid, I would pick it up, and immediately noticed a strong garlic or onion aroma. Not long after, I would nibble on the shoot, and it tasted like chives. Every once in a while as I was idling through the woods, I would pick up a shoot of this wild garlic and nibble on it.
I have since moved to Virginia, and my new lawn has more than its fair share of wild garlic (and acorns). Rather than fight it, I figured I would embrace it and use it for a nice garlic soup!
Harvesting
WARNING: Always positively ID a plant before consumption. There are two varieties of wild plant that look like Wild Garlic or Wild Onion, and are dangerous (Star of Bethlehem, and Death Camas). I did not know this until I did some net research.
I went to my front yard where the garlic was growing in early spring. It grows in little clusters shooting up through the grass.

Wild garlic coming up through grass

Wild garlic garden

Dug-up clumps of garlic

Garlic bulbs dug up
Preparation
Now that I had a full bag picked in very short order, I selected out the largest of the bulbs (probably not required) for preparation. This consisted of teasing out the grass that had been dug out along with wilted or dried debris. Then the bulbs were washed free of dirt and I cut the stringy beard of the garlic off and removed the outer layer of the bulb. Once the knife hit the garlic, the aromatic part of preparation was in full swing. It was not nearly as strong in scent or eye-watering as cutting through a pile of red onion making salsa, but has a subtle onion odor.

Cleaned Garlic Bulbs

Chopping the garlic
Making the Soup
Now.. I am not a great cook. I am not even a good cook! I have my 3-4 go-to dishes that I am sure my friends and wife are sick of, but that is all I am really comfortable with. I do love soups in the winter, and would like to get better about making it and reheating it for a warm bowl of deliciousness when I want it. I scanned the web for a recipe making vegetable broth. I did not want to use beef or chicken stock because I figured this would overpower the star of the show, our Garlic. I selected some “neutral” ingredients that I thought would work well together.
- Wild Garlic (shocker, I know)
- Water
- Salt
- Pepper
- Bay Leaves
- Carrots
- Mushrooms
- Potatoes
I diced the carrots and cut the potatoes into nice chunks. I brought the water, garlic bulbs, salt, pepper, carrots, and bay leaves to a boil and let them simmer for about 25 minutes. After that, I added the potatoes, mushrooms for another 30 or so minutes. At the end, I threw in a handful of the chopped up garlic shoots for more flavor and texture so as to not soften them too much in a long simmer. Pull out the bay leaves, and we are done!

Time for soup

Simmer down!
Bon Appetite!
And with that, a little bay leaf for presentation, and we are ready to enjoy. I think it turned out nicely. I perhaps over-peppered and salted and perhaps not long enough simmering the broth, but there was not a lot of other flavors to compete with the garlic. They were very mild in the soup, and I would have to say it was good enough to have another bowl of, and another a couple days later. The garlic is versatile and people comment on throwing it in salads, on top of fresh tomatoes and mozzarella, or other foods. It’s not good enough to crack into the standard 4 meals I prepare, but it’s good to get outside of the comfort zone, and like the acorn flour, enjoy something from the grocery store feet from my house.
Finished product
Collaboration: An Art and a Science
by Steve Struebing on Apr.16, 2011, under technoPHILE
In my day job, I manage an engineering team and have always valued usability in the products we craft. Usability is a broad term. I use it to encompass the ease of use but also the approachability of a product. The design of a thing really can make an experience pleasant or frustrating.
As engineers we can create the function, shuttle bits and bytes down the wires in an orchestra of logic, model the forces at play, but often create a product cold to the touch and to the eye. Artists and designers, by contrast, can create something that calls out to be interacted with, that evokes an emotional response, and a lasting connection to a product. However, artists are not always trained in microcontrollers and physics.
In recent travels to North Carolina and Lexington Kentucky, I was amazed at some of the kinetic sculptures and ceiling fans designed in their airports. Many engineers could create the motion, but could not easily create the experience that caused me to smile, to ponder, to stop and admire the work. That is what an artist did, and this is why the world needs collaborations of artists and engineers.
(Courtesy Jeremy Stern: www.jeremysternart.com)
Our Collaboration
I was contacted by artist Jeremy Stern who had seen my motion-feedback instructables.com project towards the end of last year. He was planning an installation for his Masters in Fine Arts that would, if possible, incorporate an element I had used in my project. He reached out for assistance, and I was thrilled to help.
Products such as ioBridge and Arduino make technology available to everyone as a language in which to voice their creativity. It just takes a little time from someone who has done it before. It helps when there are engineers who can show that the concepts are not intimidating, just the words may be. It’s not “analog and digital”, think of it as a light switch vs. a dimmer. It’s not binary 0 and 1 and how many bits, its how many combinations of heads and tails you can have with a couple pennies. By the end of the project a soldering, wiring artist had been let loose.
“Response to the project was extremely positive, and many agreed that the water and traffic portions were the most noticeable in terms of how their movements corresponded with playback. Thanks again for all your help, Steve, working with you was definitely one of the highlights of the entire project for me.”
Jeremy and I worked several times via email and over video chat and put together a design that would function for a portion of the audio elements for his project. I would like to congratulate him on his successful project “Following”, and subsequent award of Outstanding Graduating Graduate Student from UNR. Perhaps some time he’ll encounter an tinkerer/engineer who really needs help bringing her metal and plastic construction to creative life in a way that will ignite a users imagination. Perhaps he will use his considerable eye and creativity to make that happen in a future collaboration. We engineers need help from artists like Jeremy.
“Following”
“Video documentation of different visitors to the Sheppard Fine Arts Gallery, at the University of Nevada, Reno, interacting with an artwork entitled “In Concert,” as part of Jeremy Stern’s MFA thesis exhibition, “Following,” on view March 7 – 11, 2011. This exhibition explored the reconciliation of personal experience with mapped information by using the gallery’s own systems (cameras, 4-channel ceiling-mounted speakers, ceramic tile floor, hidden door, and lights) to transform the place of the gallery into an impression of the space of Reno/Sparks through a sampling and live mixing of site-specific sounds.
“In Concert” utilized two systems to measure visitor movement through the entire gallery space and play back sounds of the larger Reno/Sparks environment in which the gallery also sits. One system, co-developed with Steve Struebing of www.polymythic.com, used 3 PIR sensors per device to trigger changes in environmental sounds through an Arduino controlled mp3 player. Two devices were active in this system: one that controlled water flow of the Truckee River where normally loud sound diminished with increased movement along the sensors’ range; and another that increased the normally diminished sounds of auto traffic with increased movement along the sensors.
The second system, Eyecon, used 4 computers, each with a webcam pointed at the gallery’s 8-channel security monitor, whose cameras were angled at the grid of the gallery’s ceramic tile floor. The 8 x 12 square grid was transposed onto a Rand McNally road map of Reno/Sparks, and site specific sounds were gathered from locations on that map, within that grid. Using Eyecon, these site-specific recordings were programmed to drop down over top of anyone entering the view of the security cameras through the gallery’s 4-channel, 8-speaker sound system. The result was that visitors walking across the gallery became literal giants in the Reno/Sparks landscape, and based on how slow or fast they moved through a tile/mapped space, one might hear a brief clip or a lengthy environmental recording identifying that abstract sound as a specific location.
This work was collaboratively made with Anthony Alston, Joseph DeLappe and the Digital Media Department of UNR, Greg Gartella, Shelly Goodin, Audrey Love, Jean-Paul Perrotte, Clint Sleeper and Frieder Weiss.”
Humana Health by Design Challenge – HALO Project Results
by Steve Struebing on Feb.09, 2011, under technoPHILE

The results were published, and I am honored to have won the Assistive Tech Grand Prize. I would like to thank everyone for voting at www.instructables.com. I would like to say a big thank you to Humana for hosting the competition, and congratulations to everyone else who entered. There were some spectacular entries, especially in the area of Autism. Right in line with my interests, both high and low tech demonstrated innovative thinking.
Excerpt from Post:
“The Grand Prize for Assistive Technology went to Steve Struebing from Annandale, Va., for his Haptic Assisted Locating of Obstacles, or Project HALO. Struebing used simple sensors and vibrating motors to help people with reduced vision identify and avoid obstacles, and navigate the world more safely.”
“Humana is thrilled with the responses of so many individuals who offered well-being innovations on Instructables.com,” said Raja Rajamannar, chief innovation and marketing officer for Humana. “The many entries we received were excellent examples of how individual ingenuity can enhance health and well-being for people facing challenges.”
Thank you to the judges of the competition, who are as follows:
- Saul Griffith, PhD – 2007 MacArthur Award recipient, winner of multiple inventor awards
- Matt Herper – senior editor at Forbes magazine, covering medicine and science
- Joan Kelly– director of well-being and innovation, Humana
- Quinn Norton – freelance journalist covering science, technology and medicine
- Aaron Rulseh, MD – editor at Medgadget.com
- Kelly Traver, MD – founder, Healthiest You; author; former medical director, Google
- Tyghe Trimble – online editor, Popular Mechanics
- Eric Wilhelm, PhD – winner of multiple inventor awards, founder/CEO of Instructables
HALO – Haptic Feedback System for Blind/Visually Impaired
by Steve Struebing on Dec.12, 2010, under technoPHILE

Mols takes the Halo for a spin.
Complete Build Instructions:
Please visit www.instructables.com for the complete build instructions and story.
httpv://www.youtube.com/watch?v=hfXs5rhwCfE
Highlights/Features
– Approximate 4 feet of range
– Variable haptic sensation (frequency and intensity of vibrations increase as range decreases)
– Just over 180 degree field of view from 5 Parallax Ping))) Ultrasonic Rangefinders
Background
I have recently been introduced to some new and interesting people with passions for ideas and a belief that our power to be creative with technologies can really make a difference in the world. I used this as a springboard to create the H.A.L.O. This stands for Haptic (meaning touch) Assisted Location of Obstacles. I had watched an episode of “Superhumans” which featured a blind man who used a series of clicks, like a bat, to echo locate his surroundings. I got to thinking about other blind people and their ability to navigate freely – perhaps without the use of a guide dog or cane.
The solution uses a series of rangefinders that take input from sensors and output feedback to pulse vibration motors placed on a person’s head. As a person gets closer to an object the intensity and frequency of the vibration increases – it’s directly proportional to the distance of an object. If a region was lacking feedback, then it is safe to proceed in that direction.
Perhaps this can be useful for the visually impaired to have the freedom to possibly move about hands-free without the assistance of a cane or seeing eye dog, or serve as a complementary enhancement to those solutions. Technology has undoubtedly made our daily lives better. By using a few inexpensive components and sensors, I’ve made a device that will allow the blind to navigate their surroundings and avoid collisions.
Great posts and comments over at:
http://hackaday.com/2010/12/17/haptic-feedback-for-the-blind/#comments
http://walyou.com/haptic-assistance-for-the-blind/
http://blog.makezine.com/archive/2010/12/project_halo_helps_you_navigate_wit.html
Photos

HALO and Haptic Headband, with the control package displayed

Wearing the HALO without the Haptic Headband

Wearing the Haptic Headband without the HALO

Arduino Mega 2560, breadboard, LED field, power section, and wiring

The lab in full swing. HALO, microcontroller, and a rats nest of wires.
Miniature Wargaming Series- 4 Painting the Marines
by Steve Struebing on Sep.24, 2010, under technoPHOBE
This will be the final installment of my Miniature Wargaming Series. Again, we are covering the Ambush Alley rules system, with minis purchased from RebelMinis. I hope you’ve been able to learn that it is possible to not have to anguish over the last meticulous detail to field a squad or ten. In 15mm I would not go so far to say quantity over quality, but close. For those who have been following along, we’ve made our board, we’ve built our sprawling metropolis, populated it with some ill tempered insurgents with frickin’ laser beams on their foreheads, and now its time for our Marines. We’re good to go…

Marines hold out while sniper provides overwatch
The Paints List:
- Olive Green
- Medium Gray
- Spanish Olive
- Camel
- Desert Sand
- Black
- Twill
- Acorn Brown
- Medium Flesh

1 - Black primer

2- 50/50 Olive Green w/Medium Gray basecoat.
The 50/50 mix is simple. Just blend 50% Olive Green with 50% Medium Gray. Swirl them together and drybrush. This is your basecoat color.

3- Medium flesh on face

4- Spanish Olive dots- 50% coverage
For step 4, you will be using Spanish Olive for the first coverage of camo “dots”. Cover about 50% of the mini. Don’t stress over precision.

6- Boots in Camel
Paint the boots solidly in Camel color.

8- Camel Backpack

9- Medium Gray - Gun
Cover the backpack in Camel. Use top down drybrushing to show some highlighting. For Step 9, you will use the Medium Gray to drybrush the gun and bring out some of the details against he all black primer.

10- Twill mixed 50/50 with basecoat. Dots - 50%

11- Medium Flesh - Hands
In step 10, take the basecoat mix (50/50 Olive Green and Medium Gray) and mix it with 50% twill. This will result in 50% twill, 25% Olive Green, 25% Medium Gray. Use this to dot as you see fit.
For drybrushing the hands, remember to go against the features to ensure there is a gap for the individual fingers to show. Use VERY LITTLE paint, and just keep going over it. Too much paint and you’ve lost your natural shadows where the primer shows through.

12- Black - Dot goggle centers

13- Glue prep base
Apply two small black dots for the goggle surfaces. Place your white glue down. Apply evenly with small coffee stirrer, or the like.

14- Gravel base

15- Acorn brown base coat on base
Base: As in the previous post, use black glass-like gravel found in Craft/Hobby store (Michaels). Once the base of Acorn Brown has been applied, it will form a nice base coat.

16- Desert Sand on base
Final step! Take your Desert Sand and highlight the base texture with very light drybrushing.
And there you have it! I hope you give boardgames and wargames a try. This truly is an opportunity to have an old fashioned good time without the need to plug anything in or even know what “log on” means. It is fun, engages the imagination, and hones the skill of detail orientation and making something with your hands. Drop me a line and let me know how your painting goes. Also, if you have a great technique you use, let me know. I am always interested in other people’s hard-learned simple techniques. See you at the table, my friends….

Completed Front View - Marine

Completed Back View - Marine
-
Where the WHY is what matters.
www.twitter.com/polymythic This DIY blog is centered around modern technology (hacking, electronics, software) and primitive tech/skills (tools, techniques, including ancient technology). Focus will be on instruction and exploration of projects in these areas.

Wearing the haptic headband